Skip to content
A fresh coat of paint can completely transform a room, giving it new energy, improving lighting, and even increasing your home’s value. But before you dive into swatches and rollers, there’s more to think about than just your favorite color.
Whether you’re updating your kitchen walls or giving your living room a makeover, planning ahead makes all the difference. From paint type selection to surface preparation tips, a thoughtful approach ensures long-lasting, beautiful results.
Here’s what every homeowner or renter should consider before starting an interior painting project, brought to you by the experienced team at Local Painters.
1. Start with Interior Color Planning
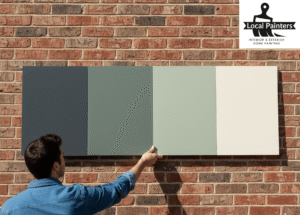
Color isn’t just decoration, it’s atmosphere. The hues you choose influence how your space feels, functions, and flows. Effective interior color planning takes into account more than just preference.
Ask yourself:
- What mood do I want to create?
- Cool tones (blues, greens, grays) are calming.
- Warm tones (reds, oranges, yellows) feel energizing.
- Cool tones (blues, greens, grays) are calming.
- How much natural light enters the room?
- Lighter colors open up darker spaces.
- Deeper shades add drama to sun-filled rooms.
- Lighter colors open up darker spaces.
- What furniture or flooring do I need to coordinate with?
- Consider undertones to avoid color clashes.
- Consider undertones to avoid color clashes.
Tip: Try samples on your walls and view them at different times of day. Lighting changes everything.
2. Understand Paint Type Selection
Different rooms have different needs. Choosing the right type of paint isn’t just about durability, it’s also about how the surface will look and perform over time.
Here’s a quick guide to paint type selection:
- Latex (water-based): Dries quickly, easy cleanup, low odor, great for most interior walls.
- Oil-based: More durable and stain-resistant, but longer drying time and stronger fumes, ideal for trim, doors, or high-traffic areas.
- Low-VOC or No-VOC options: Eco-friendly and safer for indoor air quality, excellent choice for bedrooms or nurseries.
The pros at Local Painters always recommend selecting paints that balance durability with environmental safety, especially in family homes.
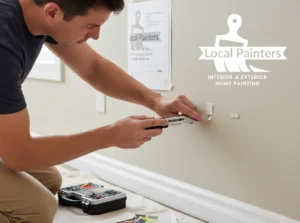
3. Don’t Skip Surface Preparation
Proper surface preparation is often the secret to a flawless finish. Even high-quality paint won’t stick well to dirty, damaged, or uneven walls.
Essential surface preparation tips:
- Clean the walls: Remove dust, grease, and mildew with mild soap and water.
- Repair damage: Fill in holes, sand rough spots, and fix any cracks.
- Prime where needed: Use primer on new drywall, dark-colored surfaces, or areas with patches.
Pro Tip: For older homes, check for lead paint before sanding or scraping.
Taking time to prep ensures smoother application and longer-lasting results, a step Local Painters never overlook.
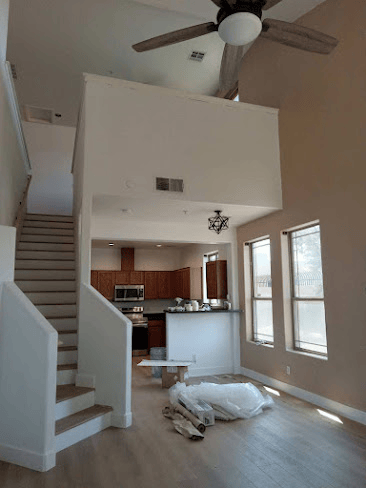
4. Tailor Your Approach with Room-Specific Painting Advice
Every room has its own purpose, lighting, and daily use, and your painting strategy should reflect that.
Here’s some room-specific painting advice to guide your decisions:
-Living Room
- Go for timeless colors or versatile neutrals to complement varied décor.
- Consider eggshell or satin finishes for a subtle sheen and easy cleaning.
-Bedroom
- Use calming hues like soft blues, muted greens, or warm neutrals.
- Matte or flat finishes can reduce glare and create a cozy feel.
-Kitchen
- Choose bright, clean colors to energize the space.
- Use semi-gloss or satin finishes that resist moisture and are easy to wipe down.
-Bathroom
- Moisture-resistant paints are essential.
- Lighter colors can help small bathrooms feel more spacious.
Tailoring your paint choices by room helps you get the best look and performance in every space.
5. Choosing Paint Finishes: Know Your Options
Not all paint sheens are created equal. The paint finish you choose affects how the color looks and how the wall holds up over time.
Here’s a breakdown of common finishes:
| Finish | Best For | Features |
| Flat/Matte | Ceilings, low-traffic walls | Conceals imperfections, non-reflective |
| Eggshell | Living rooms, dining rooms | Slightly more durable, soft glow |
| Satin | Hallways, children’s rooms | Smooth, cleanable, low-luster |
| Semi-gloss | Kitchens, bathrooms, trim | Moisture-resistant, easy to clean |
| Gloss | Doors, cabinets, decorative details | High-shine, highlights imperfections |
Tip: The shinier the finish, the more durable, but also the more it shows flaws. Choose wisely based on surface condition and traffic.
6. Don’t Forget Tools and Timing
Once you’ve picked your colors, finishes, and paint type, make sure you’re equipped with the right tools:
- Quality brushes and rollers
- Painter’s tape
- Drop cloths
- Paint trays and stir sticks
- Extension poles (for tall walls or ceilings)
Also, think about timing. Drying times vary, and painting in extreme heat or humidity can affect results. Always read the label for recoat instructions, and allow ventilation during and after the job.
7. When in Doubt, Call the Experts
While DIY painting is possible, it often comes with challenges, from uneven coats to accidental splatters. If you’re short on time, unfamiliar with techniques, or simply want a flawless result, hiring professionals can save money and frustration in the long run.
That’s where Local Painters come in.
With years of experience, our team offers:
- Personalized interior color planning
- Skilled surface preparation
- Expert recommendations on paint type selection and finishes
- Efficient, mess-free painting with lasting results
We understand the difference that details make, and we’re here to help your vision come to life.
Final Thought: A Successful Painting Project Begins with Preparation
Interior painting is one of the easiest ways to refresh your home, but success starts with smart planning. From choosing the right color and finish to prepping your surfaces and understanding each room’s needs, a thoughtful approach ensures your walls look great and stay that way.
Whether you’re painting one room or the whole house, these tips will help you get it right the first time.
Ready to Transform Your Space?
Let the experienced professionals at Local Painters handle your next interior painting project. Contact us today for expert advice, quality service, and a beautifully painted home, without the hassle.
FAQs: Interior Painting Project Planning
1. What’s the best type of paint for bedrooms and living rooms?
For most living spaces, latex (water-based) paint is ideal due to its low odor, quick drying time, and easy cleanup. In bedrooms, a matte or eggshell finish creates a cozy, non-reflective look. In living rooms, eggshell or satin finishes offer durability while maintaining a soft appearance.
2. Do I really need to prime the walls before painting?
In many cases, yes. Primer helps paint adhere better and ensures even color. It’s especially important if you’re covering dark colors, painting new drywall, or patching holes. Skipping primer can lead to uneven finishes or peeling over time.
3. How do I choose the right paint finish for each room?
The right finish depends on the room’s purpose and traffic level:
- Flat/Matte: Low-traffic areas or ceilings
- Eggshell: Living rooms and dining rooms
- Satin: Hallways, kids’ rooms, or moderate-traffic areas
- Semi-gloss: Kitchens, bathrooms, and trim
- Gloss: Cabinets or decorative accents
4. How long should I wait between coats of paint?
Most latex paints require about 2–4 hours between coats, while oil-based paints may need 6–8 hours or more. Always check the manufacturer’s label and allow proper ventilation to help with drying time.5. Can I paint over glossy walls, or do I need to sand them first?
Glossy surfaces should be lightly sanded or degloss before painting. This helps the new coat stick properly and prevents peeling. If skipped, the fresh paint may not bond well and can flake off over time.